Let’s kick off right away with writing a minimal Raylib program, which just opens an empty window and waits for it to be closed.
|
|
Save and run this program. You should see a window with a black background that is 1024x768 pixels. That’s basically it. Clicking the close button or hitting the Escape key on the keyboard will close the window.
The smallest dot you can “draw” on the screen is called a pixel. Each pixel has an x-coordinate, a y-coordinate and a color value. The top left-hand corner of the window is (0, 0) and the bottom right-hand corner has is the position (WIDTH-1, HEIGHT-1).
The program itself is quite simple. It creates a window, sets the maximum frame rate to 60, and enters a loop, which will continue until the window is closed. In this loop we can check for events, such as keyboard or mouse events and we can draw. Drawing should be done between rl.BeginDrawing and rl.EndDrawing. Once the main loop ends, we remember to close the window with rl.CloseWindow.
We of course don’t have to alias the raylib package to rl, but I think everybody does so. You’ll type it a lot, and having to type out raylib each time can get a bit frustrating over time.
Timing is an important thing when it comes to games and demos. We will look into that more as we go on. For now, simply using rl.SetTargetFPS will do just fine. At this stage we are just displaying an empty window after all!
Using constants
One quick improvement we can do is to create a few constants, so as to avoid all those literals in the code. As usual, if you don’t agree with my naming, in your version, change it to something that works for you. For instance, if you prefer the names WINDOW_WIDTH and WINDOW_HEIGHT, then use those names instead.
 1package main
 2
 3import rl "core:raylib"
 4
 5WIDTH :: 1024
 6HEIGHT :: 768
 7TITLE :: "Hellope!"
 8BG_COLOR :: rl.BLACK
 9
10main :: proc() {
11    rl.InitWindow(WIDTH, HEIGHT, TITLE)
12    rl.SetTargetFPS(60)
13
14    for !rl.WindowShouldClose() {
15        rl.BeginDrawing()
16        rl.ClearBackground(BG_COLOR)
17        rl.EndDrawing()
18    }
19
20    rl.CloseWindow()
21}
There, that’s better!
Try it out
As usual, take some time to play around with values and other stuff in the program. Change the width, the height, the title and verify that it actually changes. You can also try different background colors. You could open the file <odin>/vendor/raylib/raylib.odin and search for BLACK. There you will find all the colors that have been predefined.
You could also set a color using rl.Color{red, green, blue, alpha}. For instance, I often use rl.Color{0, 85, 169, 255} which is the deskop background color of the Amiga Workbench 1.x. You could of course create your own color constants as well.
Each of the values in Color are of type u8 and can hold values 0-255, where 0 means no intensity and 255 means full intensity.
 1package main
 2
 3import rl "core:raylib"
 4
 5WORKBENCH_BG :: rl.Color{0, 85, 168, 255}
 6WIDTH :: 1024
 7HEIGHT :: 768
 8TITLE :: "Hellope!"
 9
10main :: proc() {
11    rl.InitWindow(WIDTH, HEIGHT, TITLE)
12    rl.SetTargetFPS(60)
13
14    for !rl.WindowShouldClose() {
15        rl.BeginDrawing()
16        rl.ClearBackground(WORKBENCH_BG)
17        rl.EndDrawing()
18    }
19
20    rl.CloseWindow()
21}
But what about “Hellope”?
It’s not much of a Hellope! program if it doesn’t even print “Hellope!”, is it? So let’s add that.
 1package main
 2
 3import rl "core:raylib"
 4
 5WORKBENCH_BG :: rl.Color{0, 85, 168, 255}
 6WIDTH :: 1024
 7HEIGHT :: 768
 8TITLE :: "Hellope!"
 9
10main :: proc() {
11    rl.InitWindow(WIDTH, HEIGHT, TITLE)
12    rl.SetTargetFPS(60)
13
14    for !rl.WindowShouldClose() {
15        rl.BeginDrawing()
16        rl.ClearBackground(WORKBENCH_BG)
17        rl.DrawText("Hellope!", 10, 10, 20 rl.RAYWHITE)
18        rl.EndDrawing()
19    }
20
21    rl.CloseWindow()
22}
As usual, save the file and run. You should see the text “Hellope!”.
Centering the text
Next, let’s see if we can center the text. Centering it vertically is easy. We move the text to half of the screen height. From there we move it up by half the font size, which is 20, so 768 / 2 - 20 / 2. If we use constants, then everything should continue working even if we change the window size.
I normally suggest to keep pen and paper handy and here is a case were it can really help, at least I find that it really helps.
Look at the following image. My eyesight is not what it once was, so my daughter Vanessa gave me a hand drawing it. Imagine that your screen is 16 units wide and 8 units high. Also, let’s imagine that the text is 8 by 4 units. Also, the top-left hand corner of the screen is (0, 0). As we move to the right, the x-coordinate increases up to 15 (since the first position is 0, the last must be width - 1 = 15). The y-coordinate increases downward up to 7. Trying to draw anything outside of this visible area will clip it (that is, it will not be visible).
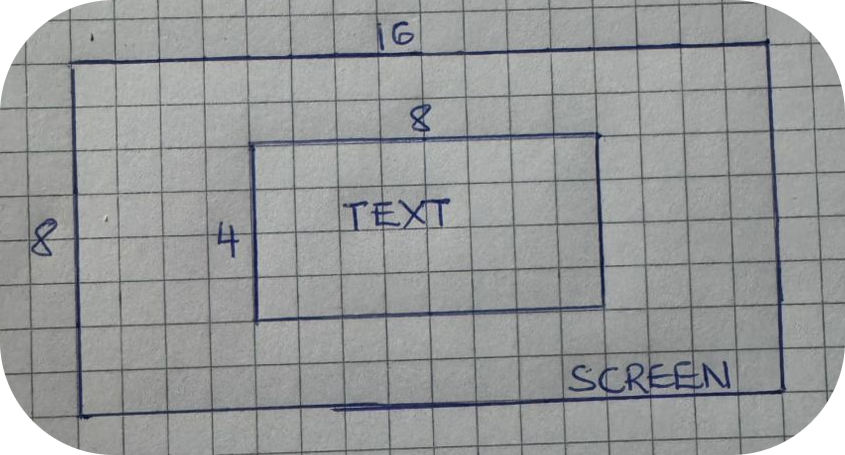
We want to know the location of the top-left corner of the text. First, lets get x and y-coordinates of the mid point of the screen, which we get by dividing the width and the height in half. Thus, the midpoint of our “screen” is (8, 4).
Next, The x-coordinate of the left border of the text area is going to be shifted by *half of the text’s width, 8/2 = 4. Also, the y-coordinate of the top border is going to be the midpoint minus half of the text height, which is 4. 4/2 = 2, which means to top-left hand corner is going to be at the coordinate (4, 2). You can draw similar figures in with different sizes for both screen and text to confirm that it always holds true.
If have odd numbers, you will be off by one. Since the screen size in our programs is 1024x768, it makes very little difference. We cannot place pixel with half-pixel precision, so we do the best we can.
However, in order for this to work, we need to know the width of the output string. Luckily for us, Raylib provides a procedure to do just that: rl.MeasureText. Since we are using constants instead of sprinkling magic numbers around in our code, we can change the values of WIDTH and HEIGHT and the program should still behave well.
 1package main
 2
 3import rl "vendor:raylib"
 4
 5WIDTH :: 1024
 6HEIGHT :: 768
 7TITLE :: "Hellope!"
 8
 9MIDX :: WIDTH / 2
10MIDY :: HEIGHT / 2
11FONT_SIZE :: 30
12
13MESSAGE :: "Hellope!"
14
15main :: proc() {
16    rl.SetConfigFlags({.VSYNC_HINT})
17    rl.InitWindow(WIDTH, HEIGHT, TITLE)
18    defer rl.CloseWindow()
19    rl.SetTargetFPS(60)
20
21    for !rl.WindowShouldClose() {
22        rl.BeginDrawing()
23        rl.ClearBackground(rl.BLACK)
24        tw := rl.MeasureText(MESSAGE, FONT_SIZE)
25        x := i32(MIDX - tw/2)
26        y := i32(MIDY - FONT_SIZE/2)
27        rl.DrawText(MESSAGE, x, y, FONT_SIZE, rl.RAYWHITE)
28        rl.EndDrawing()
29    }
30}
Of course, seeing that the title and the message are the same, it would be possible to remove one constant. I prefer to keep it this way, so that I can change them independently of each other.
I created some intermediary helper variables that are not necessary, but might help readability. If you prefer, you could of course do this instead of creating the variables tw, x and y.
rl.DrawText(MESSAGE, MIDX - rl.MeasureText(MESSAGE, FONT_SIZE)/2, FONT_SIZE/2, FONT_SIZE, rl.RAYWHITE)
Or you could do something in between, maybe create the tw variable but leave out the other two. I’ll leave it up to you to decide what works the best. At the end of the day, you are the one that has to maintain your own code, so you probably want to write something that you can read later.
One other thing to notice is that here I used defer rl.CloseWindow() instead of putting the rl.CloseWindow procedure at the end of main. Both work fine and you can choose whichever works best for you.
Raylib types
Because Raylib is a C library, there are few things to keep in mind. For example:
- text passed to Raylib functions are of type
cstring, notstring. - you usually have to case
inttoi32or simply declare the variable explicitly asi32. - the default floating point type in Odin is
f64, but Raylib usesf32. Again, declaring explicitly asf32can remove a lot of headache.
You can see examples of that in the code above, where I cast to i32 in order to avoid compiler errors.
If you’re not already used to it, it’s a really good idea to look into the source at this point. You might be using an editor that hints you about procedure arguments. I tend to find it really annoying when things pop up while I’m trying to type, so I mostly avoid those things. When I need to look something up, I prefer to go to the source files. Assuming you know where your Odin installation is, it’s a good idea to get comfortable with reading the .odin files you find in there.
e have a lot of things to go through.
On my system, Odin is installed in /opt/odin. That means the raylib package is located in /opt/odin/vendor/raylib. The most important file, at least for now, is raylib.odin. I could read through the whole file, but if I’m looking for something specific like DrawText and I’m on a Unix-like system, Like BSD, Linux or MacOS, I could use grep to quickly find what I’m looking for (sorry, I don’t know the Windows equivalent):
$ grep DrawText raylib.odin
	ImageDrawText           :: proc(dst: ^Image, text: cstring, posX, posY: c.int, fontSize: c.int, color: Color) ---                        // Draw text (using default font) within an image (destination)
	ImageDrawTextEx         :: proc(dst: ^Image, font: Font, text: cstring, position: Vector2, fontSize: f32, spacing: f32, tint: Color) --- // Draw text (custom sprite font) within an image (destination)
	DrawTexture       :: proc(texture: Texture2D, posX, posY: c.int, tint: Color) ---                                                       // Draw a Texture2D
	DrawTextureV      :: proc(texture: Texture2D, positi``` odin {linenos=inline hl_lines=["9-11",13,"24-27"]}
	DrawTexturePro    :: proc(texture: Texture2D,e have a lot of things to go through.  source, dest: Rectangle, origin: Vector2, rotation: f32, tint: Color) ---                 // Draw a part of a texture defined by a rectangle with 'pro' parameters
	DrawTextureNPatch :: proc(texture: Texture2D, nPatchInfo: NPatchInfo, dest: Rectangle, origin: Vector2, rotation: f32, tint: Color) --- // Draws a texture (or part of it) that stretches or shrinks nicely
	DrawText           :: proc(text: cstring, posX, posY: c.int, fontSize: c.int, color: Color) ---                                               		// Draw text (using default font)
	DrawTextEx         :: proc(font: Font, text: cstring, position: Vector2, fontSize: f32, spacing: f32, tint: Color) ---                        		// Draw text using font and additional parameters
	DrawTextPro        :: proc(font: Font, text: cstring, position, origin: Vector2, rotation: f32, fontSize: f32, spacing: f32, tint: Color) --- 		// Draw text using Font and pro parameters (rotation)
	DrawTextCodepoint  :: proc(font: Font, codepoint: rune, position: Vector2, fontSize: f32, tint: Color) ---                                    		// Draw one character (codepoint)
	DrawTextCodepoints :: proc(font: Font, codepoints: [^]rune, codepointCount: c.int, position: Vector2, fontSize: f32, spacing: f32, tint: Color) ---     // Draw multiple character (codepoint)
That was maybe still quite bit of text, but at least a lot less than reading the whole file, which is alsmost 2000 line long.
$ wc -l raylib.odin
1815 raylib.odin
In any case, I found the information I needed in the output above which was this:
DrawText :: proc(text: cstring, posX, posY: c.int, fontSize: c.int, color: Color)
As you can see, text is of type cstring and posX, posY and fontSize are all c.ints, which maps to an Odini32.
Colors
You might want to try printing text with a different color. You could use grep again to find a list of colors. The pattern to search for is Color{, so:
lorenzo@orthanc:/opt/odin/vendor/raylib$ grep Color{ raylib.odin
LIGHTGRAY  :: Color{ 200, 200, 200, 255 }   // Light Gray
GRAY       :: Color{ 130, 130, 130, 255 }   // Gray
DARKGRAY   :: Color{ 80, 80, 80, 255 }      // Dark Gray
YELLOW     :: Color{ 253, 249, 0, 255 }     // Yellow
GOLD       :: Color{ 255, 203, 0, 255 }     // Gold
ORANGE     :: Color{ 255, 161, 0, 255 }     // Orange
PINK       :: Color{ 255, 109, 194, 255 }   // Pink
RED        :: Color{ 230, 41, 55, 255 }     // Red
MAROON     :: Color{ 190, 33, 55, 255 }     // Maroon
GREEN      :: Color{ 0, 228, 48, 255 }      // Green
LIME       :: Color{ 0, 158, 47, 255 }      // Lime
DARKGREEN  :: Color{ 0, 117, 44, 255 }      // Dark Green
SKYBLUE    :: Color{ 102, 191, 255, 255 }   // Sky Blue
BLUE       :: Color{ 0, 121, 241, 255 }     // Blue
DARKBLUE   :: Color{ 0, 82, 172, 255 }      // Dark Blue
PURPLE     :: Color{ 200, 122, 255, 255 }   // Purple
VIOLET     :: Color{ 135, 60, 190, 255 }    // Violet
DARKPURPLE :: Color{ 112, 31, 126, 255 }    // Dark Purple
BEIGE      :: Color{ 211, 176, 131, 255 }   // Beige
BROWN      :: Color{ 127, 106, 79, 255 }    // Brown
DARKBROWN  :: Color{ 76, 63, 47, 255 }      // Dark Brown
WHITE      :: Color{ 255, 255, 255, 255 }   // White
BLACK      :: Color{ 0, 0, 0, 255 }         // Black
BLANK      :: Color{ 0, 0, 0, 0 }           // Blank (Transparent)
MAGENTA    :: Color{ 255, 0, 255, 255 }     // Magenta
RAYWHITE   :: Color{ 245, 245, 245, 255 }   // My own White (raylib logo)
Those are the predefined colors that come with Raylib. Of course, as stated above, you can also create your own colors, by combining red, blue and green. The alpha channel (the last number) indicates the opacity, where 0 means full transparency and 255 means completely opaque.
Try it out
Try changing both the background color and the text color in the Hellope! program we implemented above. You can used predefined colors, such as rl.SKYBLUE, or you can try your own, such as rl.Color{0, 199, 199, 255}. Take note of colors that pair well and ones that don’t go well together.
Summary
You are now able to create a window and to draw some text inside this window. That’s not a bad start! In the next lesson we are going to learn to draw a shape on the screen and to move it as the user presses keys on the keyboard.
Exercises
Answers to the exercises can be found here
Exercise 1
Write a modified version of the Raylib Hellope program that takes the text to print as a optional command-line argument. If the user didn’t pass in an argument, default to Hellope! (or whatever suits you).
Exercise 2
Modfiy the program above to also optionally take the width and the height of the window as options. Just like in Exercise 1, set defaults for both in case one or both are not passed in via arguments.
Exercise 3
Write a version of Raylib Hellope! that prompts the user for the message to print, the window width and height. Running the program could look something like this:
$ ./exercise-3
How wide do you want the window? 800
How tall do you want the window? 600
What message do you want to type? I'm learning Raylib
From there, an 800x600 window should open, displaying the text “I’m learning Raylib” at the center of the screen.
Exercise 4
Get comfortable with positioning the text exactly where you want it. Modify the Raylib Hellope! program to position the text as follows:
- At the top left corner, 10 pixels away from both borders.
- So that the right edge of the text is exactly 20 pixels away from the right side of the screen, with the top of the text 20 pixels from the top of the screen.
- So that the bottom of the text is 15 pixels above the bottom of the screen. The left side of the text is also 15 pixels away from the left edge of the screen.
- At the bottom right hand corner, so that both the bottom and right edges of the text are 10 pixels away from the screen edges.
Exercises 5
Fix the errors in the following program.
|
|